Tuesday, June 28, 2011

OPEN MULTIPAL FACEBOOK,GMAIL,YAHOO,ORKUT A/C IN ONE BROWSER !!

Some time we require to Login to our different accounts of Facebook, Gmail, Yahoo, Orkut etc without Signing Out from first one. If you are in such situation the you can use a Firefox Addon called Multifox which allows Firefox to connect to websites using different user names Simultaneously!. Isn’t that great. For that you require a Firefox Internet browser which you can get freely from Firefox Website.


For example, if you have multiple Gmail accounts, you can open them all at the same time. Each Firefox window, managed by Multifox, accesses an account without interfering each other. Just follow below step to get Multifox Addon on your Firefox.


1.Go to http://br.mozdev.org/multifox/
And click on Install (Install for your Firefox Ver 3.6 or 4)

2.It may give you a pop up to allow it. Just click allow and you will see a install window like below. Click On Install.


3.After Installing you will be asked to Restart your Firefox. Just save your work and Restart.
4. After restarting your browser you can right click on Tab menu and then select Open in a new Identity profile
5. It will open a new Firefox Window where you can log in to your second account freely without Log out from 1st one. Hope this trick help you. Subscribe to Tamtricksworld by Email for more tips, tutorial & News.

Iphone Tips

If you private an apple iphone, you understand there’re quite a number of exciting! This information is portion two within a group of posts that offers straightforward guidelines undertake a terrific iphone 4 encounter! (Look for the connection to my personal additional iphone ideas in the bottom informed.)i-Phone 3GS Telephone and also E-Mail Suggestions


• To end a good inward bound call up out of calling, click this sleep/wake option. To give the email straight away in order to speech send, press the particular sleep/wake key two times.
• An good way to rub out e mail is actually by simply swiping quit to be able to directly on the e-mail inside number and press this erase press button which happens to the appropriate section.
Caller ID Tips
• If you ultimately choose a photo for a get in touch with with the iphone 3gs, the selected photograph is actually shown full tv screen for your caller ID. Nice!
• If the contacts image can be relocated using the contact’s information on the handle guide, a contact’s photography can be demonstrated as being a thumbnail for the caller ID.
Keystroke plus Writing Points
• There is a simple strategy to use from your alpha dog towards the non-alpha computer keyboard a single easy swipe. All you have to undertake is usually carry down the particular punctuation critical plus glide for the identity you want to make use of then release.
• To operate the Shelves Shut aspect, make it possible for it throughout ‘general controls. I To utilize that, double-tap on the switch key as well as switch key will move glowing blue.
Yahoo Charts Tips
• Traveling a place and want to investigate surrounding area? Just simply enter the the three page air port computer code during routes and are come to which flight terminal in the spotlight. When you wanted to look into the Santa Monica boat dock on your own trip to New york, type ‘LAX’ (devoid of prices) while in routes and are delivered to the Are generally Airport terminal. A rapid zoom capability outside will advise you Father christmas Monica and several alternative adjoining places. This kind of in concert with all key air terminals in the usa many internationally international airports also.
Website Looking using Internet explorer
• If you are in the bottom of a prolonged site and wish to go back to your Link bar to consult with yet another site, likely to a lot easier method compared to scrolling entirely back in the top. In which you are well on the particular web page, dive into the top of the particular computer screen the location where the some time to life cycle of battery signal are. You’ll be straight away taken to a Web link admittance discipline.
• To electronic mail a website to anyone, touch about the tackle bar. The Share button at the top remaining can provide a message available for you. Neat!
• Simple ‘page all the way down. Ha Verify that you are definitely not zoomed-in. At this point double-tap for the underside from the display screen as well as the webpage will re-center all-around your own tap into. Make sure not to tap into the link!
• Zoom on to a certain graphic. Double-tapping photographs throughout Chrome zooms those to match your iphone 3gs exhibit. When the photograph is linked to a URL, you might not want to do this because you might be arrive at the particular site joined from the photo. Double-tap once more to revisit the particular unzoomed screen.
• Zoom upon any text ray. This performs likewise when snap shots. Double-tap about the line to slip them towards the screen. Double-tap again another out of your zoom capability. Besides Safari focus block-quoted text message individually of normal text message when you progress ones ring finger after the initial double-tap-to-fit, that translates our next double-tap for a re-center web page get rather than a return-to-previous-zoom. Quite convenient

4 WORKING FILESONIC PREMIUM ACCOUNTS [2011]


user : boemken@me.com
pass : fredfred
[check its working]

User : mohammedkarimi@live.com
Pass : bluegrana
User: meestafreeski
Pass: random

User: filesonicpremium90@gmail.com
Pass: KD83hgS&@kas

How to check 32-bit or 64-bit version of your os


check your windows xp,7 and vista i either 64bit or 32bit

While downloading Software there are two options 32-bit or 64-bit then you are confused at that time. You don't know what is 32-bit or 64-bit. Which version you are using. So i am writing this post to give you idea about knowing which version either 32bit or 64bit are you using. For xp it different style to check then vista and windows 7. Try the following.
How to know either your computer in running in 32bit or 64bit
If you are using windows xp then follow these steps:
Step1: Click on start
Step 2: Right click on My Computer
Step3: Click on Properties Now under general tab you will see like:
windows xp 64bit
Then you've 64 bit or if you see the following then you've 32bit.
windows xp 32bit
If you are using windows 7 or windows vista then follow these steps:
Step 1: Click on start(icon)
Step 2: Right click on Computer then click Properties then you will see 32bit or 64bit written there under system tab.
windows vista 64bit

That's it. Now you know either your operating system is 32bit or 64bit.

China Mobiles Secret Codes-Chinese Mobile Tips and Tricks

china mobile iphone 150x150 Latest China Mobiles Secret Codes,Tips,Tricks... 


China Mobiles Secret Codes-Chinese Mobile Tips and Tricks

*#66*# Set Factory Mode CONFIRMED
*#8375# Show Software Version CONFIRMED
*#1234# A2DP ACP Mode CONFIRMED
*#1234# A2DP INT Mode CONFIRMED
*#0000# + Send : Set Default Language CONFIRMED
*#0007# + Send : Set Language to Russian CONFIRMED
*#0033# + Send : Set Language to French CONFIRMED
*#0034# + Send : Set Language to Spanish CONFIRMED
*#0039# + Send : Set Language to Italian CONFIRMED
*#0044# + Send : Set Language to English CONFIRMED
*#0049# + Send : Set Language to German CONFIRMED
*#0066# + Send : Set Language to Thai CONFIRMED
*#0084# + Send : Set Language to Vietnamese CONFIRMED
*#0966# + Send : Set Language to Arabic CONFIRMED

CHINESE MODELS:
default user code: 1122, 3344, 1234, 5678
Engineer mode: *#110*01#
Factory mode: *#987#
Enable COM port: *#110*01# -> Device -> Set UART -> PS Config -> UART1/115200
Restore factory settings: *#987*99#
LCD contrast: *#369#
software version: *#800#
software version: *#900#
set default language: *#0000# Send
set English language: *#0044# Send
set English language (new firmware): *#001# Send

E900 software version: *#5002*8376263#
E900 full reset: *2767*3855#

Service codes Spice:
S404 enable COM port: *#42253646633# -> Device -> Set UART -> PS -> UART1/115200
S410 engineer mode: *#3646633#
S900 software version: *#8375#
S900 serial no: *#33778#

Service codes Philips:
S200 enable COM port: *#3338913# -> Device -> Set UART -> PS -> UART1/115200

Service codes “Chinese” models:
default user code: 1122, 3344, 1234, 5678
Engineer mode: *#110*01#
Factory mode: *#987#
Enable COM port: *#110*01# -> Device -> Set UART -> PS Config -> UART1/115200
Restore factory settings: *#987*99#
LCD contrast: *#369#
software version: *#800#
software version: *#900#

Service codes BenQ:
software version: *#300#
test mode: *#302*20040615#

Service codes Pantech:
software version: *01763*79837#
service menu: *01763*476#
reset defaults (phone/user code reset to default): *01763*737381#
Service codes VK-Mobile 3xx, 5xx:
software version: *#79#
software version: *#837#
service menu: *#85*364# (hold #)
Service codes VK200, VK2000, VK2010, VK2020, VK4000:
software version: *#79#
service menu: *#9998*8336# (hold #)
reset defaults (phone/user code reset to default): *#9998*7328# (hold #)

Service codes LG:
software version: 2945#*#
KG300 NVRAM format: 2945#*# -> menu 15

Service codes Sony-Ericsson:
J100 software version: #82#

Service codes Fly:
M100 software version: ####0000#
2040(i) reset defaults: *#987*99# Send
MX200 reset defaults: *#987*99# Send
MX200 software version: *#900# Send
SL300m reset defaults: *#987*99# Send
SL300m software version: *#900# Send
SL500m reset defaults: *#987*99# Send
SL500m software version: *#900# Send
MP500 reset defaults: *#987*99# Send
MP500 software version: *#900# Send
Set language to English: *#0044#
Set language to Russian: *#0007#

Service codes Konka:
C926 software version: *320# Send
C926 set default language: *#0000# Send
C926 set English language: *#0044# Send

Service codes GStar:
GM208 (Chinese Nokea 6230+) engineering menu: *#66*#
Set language to English: *#0044#
Set language to Russian: *#0007#


Motofone F3 software version: **9999* Send
***300* Set SIM Pin
***310* / ***311* SIM Pin ON | OFF
***000* Reset Factory settings
***644* Set Voicemail number
***260* / ***261* Auto keypad lock ON | OFF
***510* / ***511* Voice Prompts ON | OFF
***160* / ***161* Restricted Calling (Phonebook only) ON | OFF
***200608* Send: software version
***200606* Send: software version
***200806* Send: flex version
***250* / ***251* Keypad tones ON | OFF
***470* Select time format
***500* /***501* Prepaid Balance Display ON | OFF
***520* Change language


Service codes Motorola:
C113, C114, C115, C115i, C116, C117, C118 software version: #02#*
C138, C139, C140 software version: #02#*
C155, C156, C157 software version: #02#*
C257, C261 software version: #02#*
V171, V172, V173 software version: #02#*
V175, V176, V176 software version: #02#*
C168, W220 software version: *#**837#
W208, W375 software version: #02#* and “yes””
Note : Secret Codes try your Own Risk, Some Secret Codes may not work on your phone.


What’s Causing the Blue Screen of Death in Windows?


Every once in a while your PC might come up with an error and the dreaded blue screen of death (BSOD). Sometimes these errors are just random and probably won’t come up again. But then again, there are times when the errors are caused by a specific program/file/system component. There is an easy way to narrow down the search so that you know what’s causing these errors.


Windows creates a log whenever it crashes, and these “dumps” are usually stored in :\Windows\Minidump. These files hold the key to finding out what component or file is causing all the trouble.
To set it so that Windows creates these minidump files, follow these instructions:


For Windows XP :

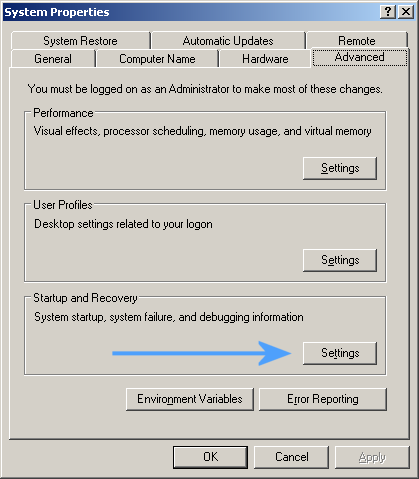
1. Right click ‘My Computer’ and select Properties.
2. In System Properties click ‘Advanced’ and then ‘Settings’ under the ‘Startup and recovery’ frame.


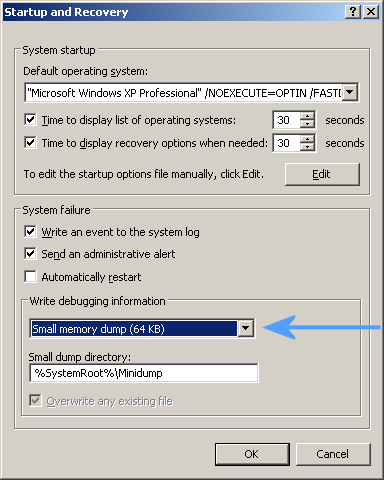
3. In the opened window, there is a frame called ‘Write debugging information’, under it, select “Small Memory Dump (64KB)” from the drop down menu and click ‘Ok’ to confirm.


For Windows 7:

1. Right click ‘Computer’ from start menu, click Properties and then click ‘Advanced system settings’.
2. Under the ‘Advanced’ tab , click the ‘Settings’ button in the ‘Startup and recovery’ frame.
3. In the opened window, there is a frame called ‘Write debugging information’, under it, select “Small Memory Dump (256KB)” from the drop down menu. Now uncheck ‘Automatically Restart’ under the ‘System failure’ frame and click ‘Ok’ to confirm.
Now, even when you know what file is causing the problem, just removing it may not solve the problem. For example, if a file with .sys extension is the cause of the problem, search for that particular file on Google and find out what it belongs to. If it is part of a driver set, simply update or reinstall those drivers. If it is an .exe or .dll file, again search and find out if it is part of a program. Simply uninstall or reinstall the program it is a part of, if it indeed is part of a program.

Sometimes even removal of the program that seems to cause the errors may not solve your problem. In this case, check the crash dumps that may occur after removal of the faulty program. The dumps will provide more insight into the faulty components because program files are often interconnected and require each other to run properly and it might have been a root file instead of the program itself that was causing all the problems.
So how can you read these crash dumps and find out what’s causing them? By using a small free software called BlueScreenView. It scans and displays detailed info of all your crash dumps so you can find out what’s causing all those pesky BSOD’s. For each crash, BlueScreenView displays the minidump filename, the date/time of the crash, the basic blue screen and the details of the component that possibly caused the crash (file/product name and version).
This immensely helpful software enables you to fix critical errors yourself and you can minimize calling any tech support. It can be run in safe mode as well so even if your PC doesn’t bootup normally, you can find out what’s preventing it from doing so. It even has multiple display modes that can help you find out the source of the problem. The displays available are:
1. All drivers loaded during the crash.
2. Only drivers whose memory addresses were found in the stack of the crash.
3. A simulated blue screen, similar to a Windows XP blue screen which displayed during the crash.
Clicking on the component displayed will bring up a menu like this one:

So here’s how you go about investigating the source of a blue screen of death:
1. Download BlueScreenView from here. Install it in desired location
2. Run it and click the first icon under File menu, the default location, let’s say C:\Windows\Minidump is already set. Click Ok and a list of previous crash dumps appear.
3. Click the last crash dump and select Options->Lower Pane Mode menu to display your desired output.
4. Read the filename, location and other details. If you don’t know what the component does, search for it on Google and find out what is it a part of.
5. Perform necessary actions like reinstalling or uninstalling the main program/driver set or whatever it is a part of.

This simple program can save you a lot of hassle while trying to figure out what is causing all those extremely annoying BSOD’s, although you have to do the actual fixing, at least you know how you can start solving the problem.
Happy fixing!

Friday, June 24, 2011

Gmail Drive guide to use Gmail space as online storage drive hack

Free Gmail drive help to use gmail space as external drive
Gmail is really famous among users of all the email clients available on the web and that is not because it has a cool interface rather it is famous for its reliability and huge space which includes storage space of 6000 megabytes  and increasing. Google doesn’t stop here and recently Google announced that users can now buy more online storage for Google services just by paying a little amount. So why not use this online storage space and use it externally probably as a network drive or one of your own computer hard drives.

Use Google Storage Space as Google Drive
I am going to show different methods by which your can use your Gmail account space as your external hard drive that too free. You will be able to download (or should I say copy) attachments from your Gmail account to your computer just as you would do from a drive on your computer. You can also use this space to upload content direct from your computer and save it online in your Gmail account.
1. GMAIL DRIVE
Gmail Drive Guide free
GMail Drive is a Shell Namespace Extension that creates a virtual filesystem around your Google Mail account, allowing you to use Gmail as a storage medium.
GMail Drive creates a virtual filesystem on top of your Google Gmail account and enables you to save and retrieve files stored on your Gmail account directly from inside Windows Explorer. GMail Drive literally adds a new drive to your computer under the My Computer folder, where you can create new folders, copy and drag’n'drop files to.
With GMail Drive you can easily copy files to your Google Mail Account and retrieve them again.
When you create a new file using GMail Drive, it generates an e-mail and posts it to your account. The e-mail appears in your normal Inbox folder, and the file is attached as an e-mail attachment. GMail Drive periodically checks your mail account (using the Gmail search function) to see if new files have arrived and to rebuild the directory structures. But basically GMail Drive acts as any other hard-drive installed on your computer.
You can copy files to and from the GMail Drive folder simply by using drag’n'drop like you’re used to with the normal Explorer folders.
Because the Gmail files will clutter up your Inbox folder, you may wish to create a filter in Gmail to automatically move the files (prefixed with the GMAILFS letters in the subject) to your archived mail folder.
Please note that GMail Drive is still an experimental tool. There’s still a number of limitations of the file-system (such as total filename size must be less than 65 characters). Since the tool hooks up with the free Gmail Service provided by Google, changes in the Gmail system may break the tool’s ability to function. I cannot guarantee that files stored in this manner will be accessible in the future.
Download
2. PHP GMAIL DRIVE (PGD)
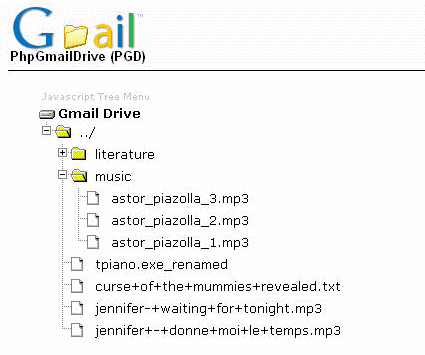
free guide for php gmail drive pgdPhp Gmail Drive is a new type of file sharing utility. Unlike typical file servers (say xDrive) it uses Gmail as backend file server. You can enjoy it simply by hosting a small PHP script in your web site without any database. Gmail file space is more than 2GB, so you can imagine you already have such a big space on internet. However, you will require a Gmail account (If you don’t have any Gmail address, go GmailSwap or ask your friends.). PGD automatically connects Gmail server and fetches list of all attached files and generate downloadable links in a tree like view. If you are looking for a file server to upload your music or notes without any hassle, PGD is ideal for you. Technically speaking PGD is wrapper of Gmailer . Thought there is  no need to know hecks of PHP or Gmailer.  Just you have to check that your PHP hosting service provider has curl extension of PHP to handle HTTP/HTTPS traffic.
Features
* Successfully connects to Gmail and only grabs list of Attachments in Gmail messages.
* List of attachments are displayed with inbuilt Javascript engine. You can customize output to any other formats.
* 100% compliant to GMAILFS. So you can upload with Windows Gmail Shell extension or Linux GmailFS utilities..
* Supports Multiple Gmail accounts in the same script .
* Supports all browsers.
* Total size is less than 100 KB.
Download Latest version
3. GSPACE
Free Gspace Guide to use gmail as drive

Gspace is the FON friendly site that provides FREE Online Storage to access your files everywhere.
Gspace turns the 2GB of your Gmail account into free online storage. With Gspace you can manage unlimited Gmail accounts to store all type of files within its simple, user friendly interface.
Listen your favourite stored music directly from your Gspace, view your collections of pictures and manage your Gdrive files as well.
Gspace works with Windows Os, Linux, and MAS OSX
Download (I think Gspace is no longer working)

Tuesday, June 21, 2011

Top 10 Most Downloaded Free Software ’s For Windows Suggested By Professionals

1) Orbit Downloader 4.1.0.1 : Orbit downloader is very useful download manager. This software is really useful when you are downloading some thing on internet like audio/video and etc. The main features of Orbit downloader is, its Super lite, Great Speed, Supports Rapidshare, Easy to use and Free of cost. Currently this software is rankedno : 1 in the section of download managers and has a total of 15,252,164 downloads so far.


2) Download Accelerator Plus 9.6.0.7 : Download Accelerator Plus which is also known as DAP is the world’s most Popular Download Manager. Widely used by millions of users sinceit boosts your download speed dramatically and provides additional security and privacy with complete flexible interface. Currently this software is ranked no : 2 in the section of download managers and has a total of 13,860,617 downloads so far.


3) Photoscape 3.5 : Photoscape is a fun and a easy photo editing softwarewhich enables you to fix photos, The software supports 34 languages and it has added Clone Stamp, added Paint Brush, added Color Picker, improved Mosaic Filter, changed Editor, added Print Button to Viewer and Editor, and etc. Currently this software is ranked no : 1 in the section of Digital Photo Tools and has a total of 13,125,649 downloads so far.


4) FormatFactory 2.60 : Format Factory can convert all popular video, audio, picture formats to other and it can support upto 48 languages. You can convert any video or audio file just like that. You can also Rip DVD tovideo file, and Rip music cd to audio file. MP4 files support all portable formats. Source files support real media files.Currently this software is ranked no : 1 in the section of Video Converters and has a total of 10,704,270 downloads so far.


5) AIMP 2.61 Build 583 : AIMP is a advanced multimedia player which includes audio converter, recorder and tag editor. The player comes witha crystal clear sound and a sensitive equalizer. Supports almost all kind of audio formats. The audio converter codes music from most different formats in wma, mp3 and etc. The sound recording will allow you to write down a sound from any audio ofthe device in system.Currently this software is ranked no : 1 in the section of Audio players and has a total of 8,332,702 downloads so far.


6) SopCast 3.4.0 : This  is a simple and free software which allows you tobroadcast video and audio or watch the video and listen to radio on the Internet for free. Its a P2P technologywhich is efficient and easy to use . You can build your own TV stations and also you can serve 10000 online users with a PC and a home broadband connection.It has channel and peer directory servers along with broadcasting and client server and many more things which will make you to make this program as your default program to broadcast videos.Currently this software is ranked no : 1 in the section of Internet TV and has a total of 6,099,763 downloads so far.


7) GOM Player 2.1.28.5039 : GOM Player if ofcourse the well-known popular player which plays a lot of video and audio formats. They have added MPEG2 source filter with improved search quality and playback error. The software is now free from many flaws which encountered in previous versions. You can experiencea better sound quality from GOM now.Currently this software is ranked no : 1 in the section of Video Players and has a total of 3,100,260 downloads sofar.


8.Unlocker 1.9.1 : Unlocker is the best software which is really useful when a file cannot be deleted or annoys you saying access denied when you are working on some thing important. This simple program allows you to end the program task when ever you want so that you can change your file to delete, rename and move options. The new program has many flavours like deleting deep directory structures and too long patherrors. Progress bars and references to previous website in UI. Fixes crashes and updates automatically when ever needed.Currently this software is ranked no : 1 in the section of Other System Tools and has a total of 2,710,367 downloads sofar.


9) Movie Subtitles Searcher 1.0 : With this simple software you can findout subtitles for your movie instantly. There is nothing you have to do, just right click on the movie, choose a language from the selection and click.Automatically your browser will open a new page showing the set of suitable subtitles available for the picture. That’s how simple it is and currently this software is ranked no : 1 in the section of Other Video Tools and has a total of 1,180,664 downloads so far.


10) FreeZ Online TV 1.42 : This is themost advanced open-source multimedia player that can handle anymedia format. It can support over 270built-in Audio and Video codecs. UMPlayer can play any media format easily. It can easily play files which are broken and incompletely without any errors. It has some inbuilt features like Subtitles search, recorder, SHOUTcast Radio player, skinable interface, audio and subtitlessync, and etc. Currently this software is ranked no : 2 in the section of Internet TV and has a total of 1,762,574 downloads so far.


These are the Top 10 Most Downloaded Free Software’s For Windows Suggested By Professionals.

I hope you liked them all. Please share some of the Professional software’s with us via comments below if you have some.

Saturday, June 18, 2011

30 Useful Ubuntu 11.04 Unity Keyboard Shortcuts

Work at lightening speed in Ubuntu 11.04 (Natty Narwhal) operating system. Ubuntu 11.04 with Unity got released with lots of cool features icon smile 30 Useful Ubuntu 11.04 Unity Keyboard Shortcuts Use the keyboard shortcut keys to make Unity much more user friendly icon smile 30 Useful Ubuntu 11.04 Unity Keyboard Shortcuts I you are in need of general Ubuntu shortcut keys checkout this article, 100 keyboard shortcut for Ubuntu .Here is a collection of 30 useful Ubuntu keyboard shortcuts for easy operation.

Ubuntu Unity Keyboard Shortcuts:

  • Windows key – shows the Unity launcher
  • Windows key + [number] – activates or opens the corresponding applications in the Unity launcher
  • Windows key + Shift + [number] – opens the corresponding applications in the Unity launcher if it’s already running
  • Windows key + T – opens the Trash
  • ALT + F1 – puts focus on the Unity launcher and you can use the arrow keys to navigate
  • ALT + F2 – opens the run a command dialog
  • CTRL + ALT + T – opens a terminal window
  • Windows key + A – opens the Applications widget
  • Windows key + F – opens the Files & Folders widget

Window Management Keyboard Shortcuts:

  • Windows key + D – maximizes or restores all windows
  • CTRL + ALT + Numpad key 1 – places a window in the lower left corner
  • CTRL + ALT + Numpad key 2 – places a window in the lower half corner
  • CTRL + ALT + Numpad key 3 – places a window in the lower right corner
  • CTRL + ALT + Numpad key 4 – places a window in the left half of the screen
  • CTRL + ALT + Numpad key 5 – centers or maximizes a window
  • CTRL + ALT + Numpad key 6 – places a window in the right half of the screen
  • CTRL + ALT + Numpad key 7 – places a window in the upper left corner
  • CTRL + ALT + Numpad key 8 – places a window in the upper half corner
  • CTRL + ALT + Numpad key 9 – places a window in the upper right corner
  • CTRL + ALT + Numpad key 0 – maximizes a window

Workspace Management Keyboard Shortcuts:

  • Windows key + W – shows all desktops and windows (Expo Mode)
  • CTRL + ALT + Up Arrow – navigate to the workspace above
  • CTRL + ALT + Right Arrow – navigate to the workspace on the right
  • CTRL + ALT + Left Arrow – navigate to the workspace on the left
  • CTRL + ALT + Down Arrow – navigate to the workspace below
  • CTRL + ALT + SHIFT + Up Arrow – move a window to the workspace above
  • CTRL + ALT + SHIFT + Right Arrow – move a window to the workspace on the right
  • CTRL + ALT + SHIFT + Left Arrow – move a window to the workspace on the left
  • CTRL + ALT + SHIFT + Down Arrow – move a window to the workspace below

Wednesday, June 15, 2011

Trick Windows XP Administrator Account

This is small but very useful XP tricks tutorial which is emphasized on the mode used to exchange/ploy Windows XP administrator password if you don`t have door to admin tab(student tab).
Just follow the steps given below.
Steps:
1. Start–>Run–>lusrmgr.msc and press Penetrate or OK.
2. Than there`s two folders: Users & Groups. You need Users, than in this folder aptly click on Administrator–>Set New Password !
So, you are now able to ploy in any Windows XP administrator tab even when it is password protected. Just follow the ploy and you will be able to bypass/ploy password, infact exchange administrator tab password.

Sign up for PayPal and start accepting credit card payments instantly.